Skinning with z3c.layout, z3c.pagelet, and z3c.template
The next topic we will look at is creating a nice skin for our application. In “regular” Zope 3, this is done using macros, which are then used in every page template. Typically these macros appear under a standard_macros view. With z3c.* components however, page templates become completely unaware of any macro they get placed in.
Dependencies
First things first, we need to include configuration for the new dependencies we will have with skinning. Open of src/zcontact/configure.zcml and add <include package="z3c.pagelet" file="meta.zcml" /> towards the top with the rest of the meta includes. This will give us the new z3c:pagelet zcml directive. Farther down you can then add two more includes:
<include package="z3c.pagelet" />
<include package="zope.contentprovider" />
Creating a Layout
Now to the interesting part. We can create what is called a layout, which is similar to a macro but much simpler. Rather than having a complicated macro which each page must use (i.e. use-macro and fill-slot), we can just create a plain page template with one particular tag set asside for the content of the actual pages. We can use different layouts for different skins, and even for different object interfaces. Here we go! Open up the file src/zcontact/layout.pt and make it look something like this (feel free to get creative):
<!DOCTYPE html PUBLIC "-//W3C//DTD XHTML 1.0 Transitional//EN" "http://www.w3.org/TR/xhtml1/DTD/xhtml1-transitional.dtd">
<html xmlns="http://www.w3.org/1999/xhtml" xml:lang="en" lang="en">
  <head>
    <title>ZContact</title>
    <style type="text/css">
      <!--
       * {
         margin: 0;
         padding: 0;
       }
       body {
         padding: 1em;
       }
       #content{
         border: 1px solid #999;
         padding: 1em;
         background: #eee;
       }
      -->
    </style>
  </head>
  <body>
    <h1>ZContact</h1>

    <!-- THE MAGIC HAPPENS IN THE LINE BELOW -->
    <div id="content"
         tal:content="structure provider:pagelet">Page Content</div>

    <i>ZContact Tutorial Application</i>
  </body>
</html>
Notice in particular the line towards the bottom that says:
<!-- THE MAGIC HAPPENS IN THE LINE BELOW -->
<div id="content"
     tal:content="structure provider:pagelet">Page Content</div>
As you can guess, this is where the magic happens. The provider:pagelet part tells zope to look up a content provider called pagelet, which via z3c.pagelet ends up being the content for the page we want to look at, whether it is a form, or another page template. So that is pretty cool, but now we need to register this layout for our skin in zcml. Open up zcontact/skin.zcml and add the following directive, which is pretty self explanatory:
<z3c:layout
    for="*"
    layer="zcontact.layer.IZContactBrowserLayer"
    template="layout.pt"
    />
Also, don’t forget to add the z3c xml namespace to the configure tag with xmlns:z3c="http://namespaces.zope.org/z3c".
Using Layouts with Pagelets (and Templates)
Now that our layout is made, we have to do a slight conversion of our existing pages so that they will actually use the new layout machinery. Step one is to open up zcontact/browser/configure.zcml and add the z3c xml namespace to the configure tag: xmlns:z3c="http://namespaces.zope.org/z3c". Now, wherever you use a page tag, replace the page tag with z3c:pagelet without changing anything else. Now we are 90% there. The one caveat with pagelets that makes them really different from regular pages is that they have nothing to do with page templates. The pagelet directive does not take a template attribute and requires a class attribute. For most of our pages, which just use auto-generated form content, this isn’t a problem. For the front page though, we want our own template.
Start by replacing the last directive for the front page with the following:
<z3c:pagelet
    name="index.html"
    for="zope.app.folder.interfaces.IRootFolder"
    permission="zope.Public"
    layer="zcontact.layer.IZContactBrowserLayer"
    class=".contact.FrontPage"
    />
Notice that I got rid of the template attribute and added a class attribute for our yet to be written FrontPage class. Let’s go write that class so we can finally be done with this skin conversion. Open up zcontact/browser/contact.py and down at the bottom add the following:
class FrontPage(BrowserPagelet):
    """Pagelet for the front page."""
along with from z3c.pagelet.browser import BrowserPagelet at the top. At this point you should be thinking, “what happened to our page template and this class looks useless.” Despite not having any real substance, this class does quite a bit because it inherits from BrowserPagelet. The BrowserPagelet class provides a special __call__ method which uses an adapter lookup to find the... template. You might say, “An adapter lookup to find a template? Does that mean we can register different templates for the same page(let)?” The answer is a resounding yes. We can either specify the template for the pagelet in the pagelet class (using template = ViewPageTemplateFile('frontpage.pt')), or we can register a template to use in zcml for a particular skin. For demonstrative purposes, we’ll do the latter. Go back to zcontact/browser/configure.zcml and add the following directive right under the front page pagelet:
<z3c:template
    template="frontpage.pt"
    for=".contact.FrontPage"
    layer="zcontact.layer.IZContactBrowserLayer"
    />
Using Layouts with Forms
There is one more caveat left before our application can be all sparkly. The z3c.form package was designed in such a way to be usable without all this new layout and pagelet business (a good thing). Fortunately, the z3c.formui package provides support for layouts with its own form module. To convert our existing forms to use the layout mechanism, we have to switch our imports so that instead of from z3c.form import form, we use from z3c.formui import form. The imports at the top of zcontact/browser/contact.py should now look this this:
from z3c.form import field, button
from z3c.form.interfaces import DISPLAY_MODE
from z3c.formui import form
from z3c.pagelet.browser import BrowserPagelet
from zope.traversing.browser.absoluteurl import absoluteURL
from zope.traversing.api import getParent, getName

from zcontact import interfaces
from zcontact.contact import Contact
Finally, we just need to change our zcml page declarations to be pagelet declarations. In other words, in browser/configure.zcml you would change
<page
    name="addContact.html"
    for="zope.app.folder.interfaces.IFolder"
    permission="zope.Public"
    layer="zcontact.layer.IZContactBrowserLayer"
    class=".contact.ContactAddForm"
    />
to become
<z3c:pagelet
    name="addContact.html"
    for="zope.app.folder.interfaces.IFolder"
    permission="zope.Public"
    layer="zcontact.layer.IZContactBrowserLayer"
    class=".contact.ContactAddForm"
    />
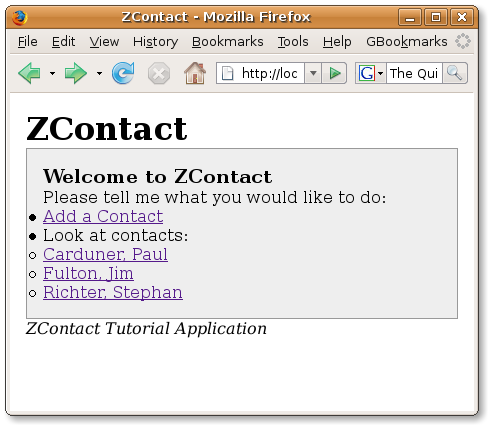
That concludes our skin transformation, so you should now be able to restart the web server and jump into a beautiful skin (unless you copied my CSS unwaveringly). Here are some screen shots of our new pages:

