Table of contents:

Grapebreeders Home Page
A beginners guide for seeds germination.
Written by Søren Larsen, with great help from Peter Cousis, Mark Hart, Bill Shoemaker, Jim Bruce and others.
|
Table of contents: |
|
If you have seeds from a grapevine, probably your own crosses, you have to store them over winter. Any number of strategies for storing seeds seem to work just fine
.
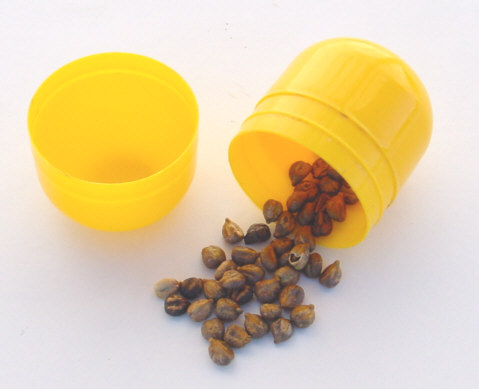
The seeds can be placed in damp sterilized sand, peat moist, vacuum plastic bags or just in a little humidity tight box./bag (Kinder eags, film canisters or Magenta boxes). The seeds are then stored in the refrigerators' vegetable crisper.
Dry storage (afterripening) prior to stratification can possible decreases the length of the chilling period required.

The seed dormancy is broken by a relatively long period of cold stratification, at least 12 weeks at temperature from 0 to 4 °C. Repeated cycles of cold and warm treatment seem to induce germination to higher percentages. Harvesting seeds in October means that the Stratifying period ends in late January or in early February. A cycle of 12 weeks at 4 °C, 1 week at 20 °C followed up by 8 weeks at 4 °C could increase the length of the stratifying period to late Marts.
Before you go to scarifying the seeds, you must be sure that the seeds have survived the winter. The seeds should be firm, whitish to whitish-light grey endosperm on the inside. If you cut through the seeds longitudinally, you should see a small embryo embeded in the endosperm. This would indicate that they are okay. Any mushiness and they're gonners. You can also float the seeds if you don't want to kill them. Live ones generally sink, dead ones float.
The pericarp seems to exert a mechanical inhibition on germination of the embryo. Although the pericarp is somewhat water-permeable, it severely restricts the penetration of water into the embryo. This is the reason for the scarifying that can be done in several ways:
The observation that seeds passed through birds' gizzards enhances germination can give you new ideas …
Grape seeds are not light sensitive. You can germinate them in the light or in darkness. Mark Harts experience suggests that a surface sterilization is beneficial. He tells: I use a 1% sodium hypochloride solution. In the US laundry bleach is about 5% NaOCl, dilute it 4 or 5 : 1. I also add a small drop of surfactant (Tween or microdrop of dish detergent) to the solution. Seeds are soaked for about 15 minutes, and I use a little agitation. I do this in a petri dish, wear rubber dish gloves. Use solution only once.
Leaching in distilled water for 24 h prior to cold stratification increased germination percentages. So please soak the grape seeds for 24 hours in distilled water before germination.
Two methoded for germination:

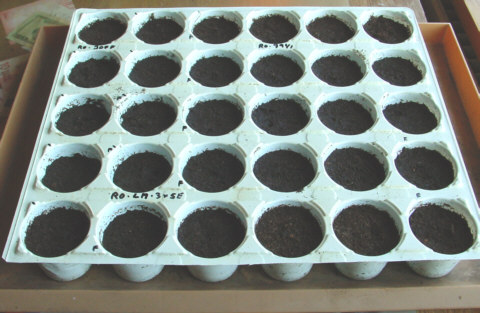
This is a great way to have many small pots, 30 x 2½" all in one
The seeds is placed app. one to 3 times
the lenth of the seed in the soil.
You can use sterile media for germination. The seed can be buried in
a toplayer of something very light – the fine perlite (not normal coarse type)
works quite well, or sterile sand. This is just the top layer (above seeds),
below is the standard sterile soilless mix.
You could also use a surface fungicide on the seeds that is effective against
oomycete fungi (such as damping off and grape downy mildew). I know captan and
metalaxyl have been used. I have not tried this, and would be reluctant to until
I had done trials on "throw away" seeds.
As soon as the cotyledons
are present. They need strong
light.…
No this is not a cup of thé, it is the preparation of the "petri" germination method. Notify that no seeds is floating in the cup. Description here |
|
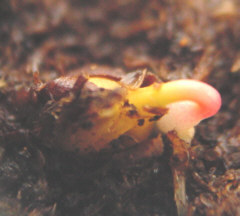
After 2 weeks you should be able to see this the cotyledon coming ... the picture is a cross of Ortega x Solaris after 12 days.

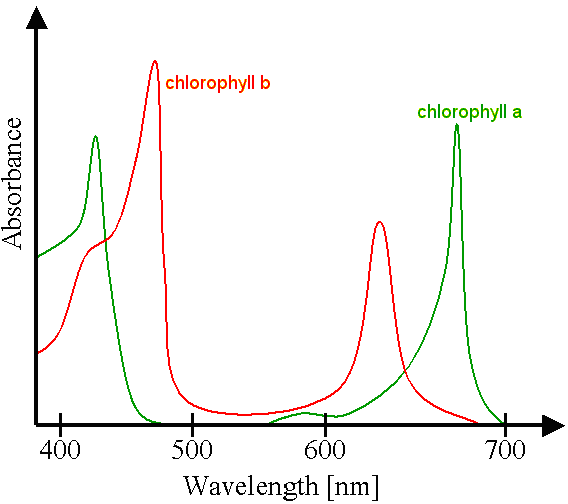
The photosystem reaction centers consist of a "special pair" P700 & P680 ( P for pigment and the number is the specific absorption peak in nanometers for the chlorophyll molecules) As the picture of absortion shows, there is no energi taken from app. 500 to 600 nm. (nanometers) Therefore there is no need for light in this green/yellow range. Horticulturists say that blue light is the most important for leaf growth and that red light encourages flowering.


Chlorophyll 'a' is universal and Chlorophyll 'b' is mostly in land plants.
Now the best choise of light to seedlings will be a tube in the blue/ cold end of the colorscale. There is pratical no limit for the intensity of the light. Daylight with sunshine is app. 100.000 lumen, and a typical 38 W tube is around 2500-3000 lumen. Grolux tubes only supply you 950 lumen, so forget all about this type of tubes. Special light sources like Maxgrow 180W CFL 8U 4200K (4U 2100K + 4U 6400K) - 92% PAR gives you up to 14000 Lumens.
Now 10 times 38 W tubes give you 30.000 lumen, a good start. But just remember that you well heat the nursery with more than 600 W (add lost in the coils to the heat). So you will heat up the bed, increasing temperatures in the nursery bed will demand more light, more light gives you more heat ... there is only one solution, setup a fan cooler !
GIB Lighting Flower Spectre 400W Deluxe is the closest you get to sunlight lumen... cut & pasted : It has an excellent lumen output (400W 55.000 Lumen and 600W 90.000 Lumen), and its spectrum achieves outstanding results, particularly in the stimulation of photosyntetic activity (400W 120.000 Phyto-lumen and 600W 193.500 Phyto-lumen). A perfected product at an unbelievably reasonable price. Tube price in Denmark 25 $ coil needed 60 $.
Some hardcore breeders add fungus disease the first year to select the most hardy vines. I´'m not sure that I will follow this line, cause my goal is to get very early varieties. I also believe that the least resistant vines could have most genes from Vinifera, so maybe you will kill all vines with the better taste ? Now a less resistant hybrids (with good tasting grapes) still got genes from the other parent, and this could make it suitable to work with in future crosses.
Now the next wish is ofcause grapes... here you just have to remember that the new vine is first going into a kind of childhood. The 'wild' grapevine is programed to climb the high trees in the wood. It knows that it takes years to get up into the light, so it will not set fruit until it is placed in a very bright spot.
Grape seed treatment and germination by Peter Cousins
One approach to managing irregular germination is to sow grape seeds in flats, then transplant seedlings into individual pots. When seeds are planted in flats, less space is required for each seed than if direct sown, since only seeds which germinate receive their own pot. We observed that transplanted seedlings were noticeably smaller than seedlings of similar age and genetic background that had been sown directly. But since grape seed germination is rarely uniform, planting seeds in individual pots often is a waste of space, media, and equipment. We developed a technique to reduce the negative effects of transplanting while allocating individual pots only to germinated seeds.
The seeds are extracted from mature fruit and washed to remove pulp. We remove the berries from the rachis and place them in a zipper lock freezer bag (such as Ziploc or Glad brand). Then you can knead the fruit, mashing it and not get your hands sticky. Use a flotation method to separate off the skins and pulp. Using two beakers (such as 2 or 3 L beakers) and a sieve, run water into the beaker with the mashed fruit and seeds. The seeds will sink faster than the skins and pulp and you just pour off the top fraction. Seeds that float are usually not viable and can be discarded.
We do not generally dry our seeds. We put the moist seeds into plastic containers (film canisters or Magenta boxes). Fill the container with distilled water and then pour off all of the free water (in a film canister, you can put your thumb over the seeds and turn the whole thing upside down, but with a Magenta box you have to use the lid). Now the seeds are moist. Seal the containers with parafilm. The seeds are cold treated at least three months at 2 - 4 °C. We start using them after three months cold treatment.
After cold treatment, grape seeds are soaked for 24 hours in distilled water. We then washed the seeds thoroughly to remove any residual pieces of pulp and skin. Seeds are placed on blotter paper (two disks; ours happen to be blue in color) in plastic culture dishes (100 x 15mm). The blotter paper is moistened just to dripping with distilled water. A piece of facial tissue paper can also be used in place of blotter paper. We place no more than 25 seeds in a single culture dish, since more than 25 seeds seems to hinder germination and leads to discoloration of the blotter paper. Seeds that have not been soaked in water and then washed thoroughly prior to plating seem to be more subject to contamination by fungus on the dishes. Fungal contamination appears to slow seed germination and reduce viability of sprouted seeds. Dishes with grape seeds, bound with rubber bands to preserve humidity, are placed in an incubator (temperature range 20 to 30 °C). Keep the blotter paper moistened, checking it frequently (the rate of drying varies with the environmental conditions and seed germination).
As seeds germinate, they are transferred to pre-moistened soil mix in individual pots (6 cm x 6 cm). Germination typically begins about one week after we place the seeds into the dishes. Good results are obtained when transfer occurs once the emerging radical is slightly longer than the length of the seed. Transferred seeds are placed in a depression made with a pencil, with the radical pointing down. Seeds are only barely covered with soil using a gentle stream of distilled water from a squirt bottle to wash the soil mix around the seed. We cover the containers of transplanted seeds with moistened newspaper (8-20 sheets) and fit these tightly over the pots. The moistened newspaper helps to maintain humidity; additional watering is not required. Uncovered pots dried out rapidly and demonstrate poor emergence of seedlings. Seedlings are not watered until after the removal of the newspaper, which follows emergence of cotyledons, beginning approximately one week after transferring sprouted seeds.
Seedlings transferred from plates take the same amount of time to reach a given development state, the two true leaf stage, as did directly sown seedlings, approximately one month (one month from plating or direct planting). Seedlings transferred as germinated seeds appear to grow as vigorously as directly sown seedlings, but require less room per germinated seed. Seedlings transferred from plates are markedly more vigorous than seedlings which are germinated in flats, then transplanted into individual pots. Additionally, although germination of seeds on plates continues over several weeks, generation of large groups of seedlings from different populations at the same developmental stage is possible using this technique