Using the Wave Studio
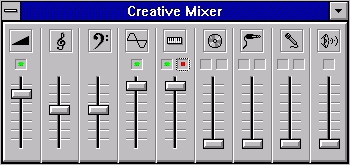
by Kai PihlWhen recording the output of EMU8000 itself, Vienna, Wave Studio and Mixer should all be running and displayed at the same time on the screen. You have to do some arrangements to get them fit there. In Vienna you only need the Three and Key/Velocity/Range views. Wave Studio can be as small as possible when used for recording. Mixer can be opened from Wave Studio Options menu. In the beginning it should be displayed in it's expanded view. You should slide CD, Line in, Microphone and PC-speaker volumes to their minimums (zero). Check that they don't have those green and red dots visible in the check boxes over the sliders. Have the Main, Wave and Synth volumes at about 90 % of their maximum. Keep the tone controls in the middle. Get the green dots visible on these three channels and also the red dot on the Synt channel as shown in the picture below. After this you can use the Custom View to get only the Main, Wave and Synth volumes visible. All this applies to the recording from other sources, except that you choose another input channel instead of synth.

You should also disable the automatic gain control (AGC) from the Recording Settings of the Mixer. This is for recording the sound without any attenuation at the peaks. There's also a recording gain multiplier, which I recommend to be keeped in x2 for both channels. There are reasons to keep it at x1 as for getting the signal-to-noise ratio as big as possible. On my opinion these noise aspects are a little bit overemphasized. I use multiplier x2 in both recording and playback, and I'm satisfied with it.
Now you can switch to the Wave Studio. If you click on the taperecorder like record button (with red dot) there opens a window named 'New Recording...'. The Settings button brings you to the selection of Channnels, Sampling Rate and Sampling Size. They should be set according to that we've discussed before: Mono, 22050 samples per second and 16 bits. If you now leave the 'New Recording...' window open and move to the Vienna and play some note from the virtual keyboard you should see the level indicators of the 'New Recording...' window to swing accordingly.
We are ready to make a recording of a sound played by the EMU8000. Push the Start button, move immediately to Vienna and play a note with the virtual keyboard. You can see the level indicators swing everytime you hit the key. The recording takes quite a lot disk space. If you record with above mentioned settings, you need 44 kB for every second of sound. This makes 440 kB for ten seconds and 2.64 MB for a full minute of sound. Wave Studio is capable of use the disk. So there should be a sufficient diskspace for the recordings. The recording can be stopped by pushing the Stop button in the 'Recording...' window. Now you can view and edit the recorded sound.
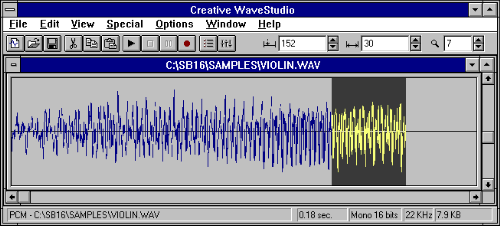
In Wave Studio, the recorded sound can be examined and edited in many ways and with high accuracy. Lets assume that have recorded the same violin sound we've already used. It looks the same than in the picture we saw earlier. In Wave Studio you can zoom the view in and out vertically, i.e. in time domain. You can examine a small portion of it, only a few milliseconds, or the entire sample at once. Units can be expressed in milliseconds, samples or bytes.

In the picture above we see a typical Wave Studio view. It shows the recorded violin sound played from middle c. The first of the three small white rectangles on the right side of the toolbar is used to set the wave cursor (i.e. the point in the sound we are at a particular moment). The units are set in this example to milliseconds. We can see that the cursor is at point which corresponds 152 milliseconds from the beginning of the sound. The next value is used to set the width of the selection area (colored yellow). In example it is 30 milliseconds. If there's a selection, the cursor is always in the beginning of it. This way we get the whole length of the sound as 182 milliseconds. Earlier in our calculations we got 183 milliseconds. The difference is due to a rounding Wave Studio always makes downwards. The length is actually 182,9 milliseconds.
The third value is used to set the horizontal resolution. It can be changed by dragging the vertical scroll bar at the rigth side of the window or it can be set by typing in the new value. In the picture it is set to 7. At 1 the indidividual samples start to be distinguishable. At -7 they can be seen very clearly.
If we change the units to samples, we can see that the cursor and selection values change to 3358 and 678, accordingly. Together these make 4036 samples. Why is this only a half of that we got in previous calculations? Remember that EMU 8000 plays back at a constant 44,1 kHz speed and we recorded it's output at 22,05 kHz sampling rate and that's why we get only half as much samples. Two times 4436 is 8072 and we calculated 8073. The difference of 1 samples is again due to the rounding errors.
This way we have proved our theoretical description of the operation of EMU 8000. But why is this so important? Doesn't this kind of knowlegde belong to the engineers? No, it doesn't! We need this information to manage our own sound banks in a professional way. Of course there's possibility to make instrument sounds experimentally. It can be fun and pleasant, no doubt. But if we need a real instrument sound, and we wish it to be at least near the original, we need this information.
One thing that should be clear after this explanation, is that the sound produced by a synthetizer is dynamic although the original recording is static. The produced output varies in length according to the played note. Four of the envelope phases are still static, although there are those parameters for the hold and decay phases that shorten and lengthten the time spend in those phases according the used key. The lengths of the attack and release phase are always static. Initially all these phases must be determined exactly. A rough example of what could happen, is a case where the attack phase is so long and the sound so short that it ends before the envelope reaches a reasonable level for hearing.In the next chapter we apply this knowledge to examples of real world. We make our own sounds and study how the various envelope settings affect them.
Next: Using envelopes Prev: Measuring the sound To: The contents