Using envelopes
by Kai PihlMaking an own test sample
When you start to use envelopes and the associated phases, you encounter many odd things. In this chapter I try to explain some of these pecularities. The best way to learn these properties is to experiment with simple selfmade examples. With simple I mean that they should not be real instrument sounds but voices varying in pitch at known time intervals. To make this kind of sounds you need a digital audio editor capable to produce sine waves of different frequencies. Sorry to say, but Wave Studio although so good otherwise, is not able to do this. But don't worry. You can find good editors as shareware on the net. One famous audio editor is Goldwave.
With Goldwave for example, you can produce sounds, which have, say 1 sec of 261.63 Hz (middle c) in the beginning, then 1 sec of 523.26 Hz (one octave higher c) and at the end 1 sec of 261.63 Hz again. If you then import this sound to a SoundFont bank and make it act as an instrument, you can experiment with it and find out the properties of the volume envelope. If you set the root key of the sample to middle c, the EMU 8000 plays it back from that key exactly with same speed as the original. Because the individual parts of the record are as long as 1 seconds, you can distinguish them easily. The ranges of different phases are wide enough to be used in these experiments. If you dont have Goldwave or you don't want to learn to use it, you can download the sample here. (If your browser has been set to play wav-files automatically, you can save this file by clicking the link with the rigth button of your mouse.) It's a 132396 bytes long, 22.05 kHz 16-bit Mono sample, named TEST.WAV.
Vienna2 is especially useful because of it's measurement units which are from real world. Seconds are seconds and decibels are decibels. Values are adjusted with sliders as in Vienna1 but you can see the real values all the time. Let's begin to examine how the volume envelope works.
Vienna2 starts with a new bank opened. A new bank is always empty with no sounds and no instruments. Before you can create an instrument you need a sound for it. We are going to create an instrument with the test.wav sound. In order to create that instrument we must first load the sample to the User Sample Pool.

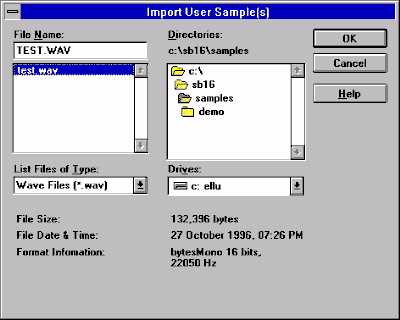
Choose Add User Sample(s) from the User Sample Pool selection of the Options menu. It opens a standard File Select dialog where you can navigate to the folder where you placed the test.wav. After selcting the file, you can see it in the User Sample Pool folder of Vienna2.
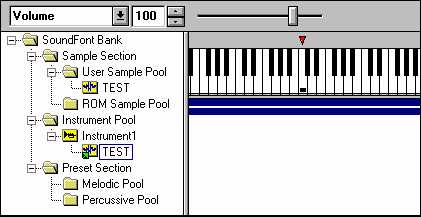
Then choose New Instrument from the Instrument Pool selection of the Options menu. It opens a dialog where you can give the instrument a name. We can leave it as default, Instrument1. After the instrument gets it's name Vienna wants to know which samples we are going to use with it. Because we have only one sample in our Sample Pool, TEST is the only sample in the list. When we choose it we can see the instrument in the Instrument Pool folder. Now that we have one instrument in our brand new soundfont bank, we can test it.

If you press the key marked with a red triangle above the keyboard, you hear the stored sample in it's root key, in the middle C (C4 = #60). We didn't change the root key because we used in our recording waves that were in C4 and C5. At the root key we hear the sample as it is; with the same speed or at the same pitch it was sampled. Lower keys play it with slower speeds and higher keys with higher speeds. Check it by yourself with your wrist watch. At middle C4 it takes exactly 3 secs to play the sound. Keep the key down for a period enough to hear the sample end. Then press a key one octave lower. The sound should now last two times more (ig. 6 seconds). And of course sound played one octave higher should last 1,5 secs (half of that played in middle C.)
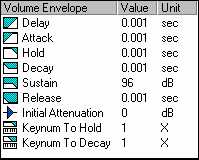
Now when we have a suitable sample for our purposes, we can start to examine the different phases of the volume envelope. In Vienna2 the values of sound parameters are shown on the bottom of the screen. At this stage we look only at the Volume Envelope parameters.

We are already familiar with the first six parameters. The three others are discussed later. The sample must be selected by clicking it's name in the Instrument folder or by clicking it's zone in the Range view. When it's selected the names and values of the parameters are not shaded and can be edited. By clicking on one value, no matter what, we get into Volume envelope dialog box.

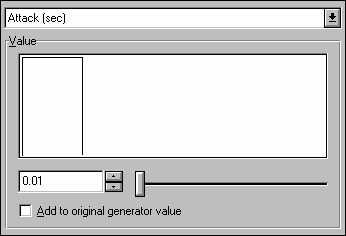
This dialog box lets us to change the values of the different phases in the volume envelope. By clicking the selection arrow in the upper part of the dialog box, we can change the phase we want to modify. This user interface is something that I can't understand. Or I can. This is probably what Bill Gates wants, but I don't. Why couldn't they use the TAB-key for changing parameter and the arrow keys for changing the value, simultaneously? When you at least get into the action by clicking first the selection arrow, then the appriate phase and then the slider knob, you'll notice that the cursorkeys move the slider in big steps! Why not in unit values? In order to set the parameters exactly you must active the value itself and input the new value by hand or use the small up and down arrows. Unbelivable!
Next: Odd properties of the volume envelope Prev: Using Wave Studio To: The contents