On the morning of 7 December 1941 USS Oglala, flagship of the Pacific Fleet Mine Force, was tied up outboard of the light cruiser Helena. They were alongside Pier 1010 at the Pearl Harbor Navy Yard, with an eight-foot camel between them. Japanese torpedo planes of the first attack wave hit the cruiser with a single torpedo, which ran under Oglala to hit Helena's starboard side. The torpedo's explosion broke through the minelayer's port bilge amidships, and she rapidly took on water. A bomb that burst nearby caused further damage. With the marginal watertight integrity typical of older ships, Oglala's flooding could not be contained.
When it became clear that she might sink, Oglala was moved aft of Helena, so she would not pin the warship against the dock. About two hours after receiving her initial damage, she rolled over to port and sank beside 1010 dock. There Oglala became the object of a prolonged, and ultimately successful salvage effort.
This page features views of USS Oglala during and shortly after the 7 December 1941 attack on Pearl Harbor.
For other views of USS Oglala, see:
For other pictures of, or related to, attacks on ships in
and near the Pearl Harbor Navy Yard on 7 December 1941, see:
| If you want higher resolution reproductions than the digital images presented here, see: "How to Obtain Photographic Reproductions." |
Click on the small photograph to prompt a larger view of the same image.
|
Photo #: KN-32031 (Color) "The Japanese Sneak Attack on Pearl Harbor" Charcoal and chalk by Commander Griffith Bailey Coale, USNR, Official U.S. Navy Combat Artist, 1944. For more information on this artwork, see: Photo # KN-32031 (complete caption). Courtesy of the U.S. Navy Art Center, Washington, D.C. Official U.S. Navy Photograph. Online Image: 73KB; 900 x 300 pixels Reproductions of this image may also be available through the National Archives photographic reproduction system as Photo # 428-KN-32031 |
 |
|
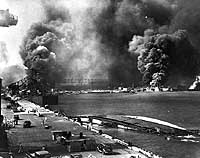
Photo #: 80-G-474789 Pearl Harbor Attack, 7 December 1941 View from Pier 1010, looking toward the Pearl Harbor Navy Yard's drydocks, with USS Shaw (DD-373) -- in floating drydock YFD-2 -- and USS Nevada (BB-36) burning at right, 7 December 1941. In the foreground is the capsized USS Oglala (CM-4), with USS Helena (CL-50) further down the pier, at left. Beyond Helena is Drydock Number One, with USS Pennsylvania (BB-38) and the burning destroyers Cassin (DD-372) and Downes (DD-375). Official U.S. Navy Photograph, now in the collections of the National Archives. Online Image: 119KB; 740 x 610 pixels Reproductions of this image may also be available through the National Archives photographic reproduction system. |
 |
|
Photo #: 80-G-32953 Pearl Harbor Attack, 7 December 1941 View looking down Pier 1010 toward the Pearl Harbor Navy Yard's Drydock Number One, in center, which holds the battleship Pennsylvania (BB-38) and the burning destroyers Cassin (DD-372) and Downes (DD-375). Alongside Pier 1010, in the center middle distance, are the light cruiser Helena (CL-50), listing slightly from a torpedo hit, and the capsized minelayer Oglala (CM-4). Taken on 7 December 1941. Official U.S. Navy Photograph, now in the collections of the National Archives. Online Image: 76KB; 740 x 610 pixels Reproductions of this image may also be available through the National Archives photographic reproduction system. |
 |
|
Photo #: NH 83066 Pearl Harbor Attack, 7 December 1941 View looking toward 1010 Dock, with USS Oglala (CM-4) capsized in the foreground. To the left is USS Argonne (AG-31), with USS Sacremento (PG-19) barely visible beyond her. Collection of Vice Admiral Homer N. Wallin. Official U.S. Navy Photograph, from the collections of the Historical Center. Online Image: 100KB; 740 x 610 pixels |
 |
|
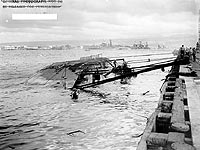
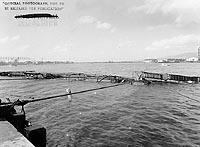
Photo #: NH 60672 USS Oglala (CM-4) Capsized alongside 1010 dock at Pearl Harbor, 9 December 1941. She was sunk during the Japanese air raid two days earlier. Preliminary salvage work on her is already underway "Battleship Row", by Ford Island is in the distance, with USS Maryland (BB-46) in center, alongside the capsized USS Oklahoma (BB-37). Astern are USS West Virginia (BB-48), sunk alongside USS Tennessee (BB-44). Farthest to the right are the sunken and burned-out remains of USS Arizona (BB-39). Official U.S. Navy Photograph, from the collections of the Historical Center. Online Image: 105KB; 740 x 580 pixels |
 |
|
Photo #: NH 50140 USS Oglala (CM-4) View taken from 1010 Dock, showing the capsized ship's starboard deck edge and embarkation ladder, 9 December 1941, two days after she was sunk in the Japanese attack on Pearl Harbor. In the center distance is the beached and sunken battleship Nevada (BB-36). USS Shaw (DD-373), wrecked in the floating drydock YFD-2, is in the left center distance. Ford Island Naval Air Station is at right. Photograph was taken by Pearl Harbor Navy Yard. Official U.S. Navy Photograph, from the collections of the Historical Center. Online Image: 73KB; 740 x 570 pixels |
 |
|
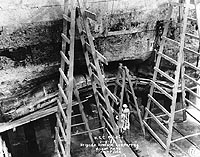
Photo #: NH 84007 USS Oglala (CM-4) Closeup view of torpedo damage to the ship's port side midships hull, taken on 4 July 1942 in drydock at the Pearl Harbor Navy Yard. Oglala had been sunk beside Pearl Harbor's 1010 dock during the 7 December 1941 Japanese attack, but was not herself directly hit. The heavy damage to her hull seen here was caused by the explosion a aerial torpedo on USS Helena (CL-50), which was alongside some eight feet distant from Oglala. Courtesy of the Naval Historical Foundation. Collection of The Honorable James V. Forrestal. Official U.S. Navy Photograph, from the collections of the Historical Center. Online Image: 147KB; 740 x 605 pixels |
 |
For other views of USS Oglala, see:
For other pictures of, or related to, attacks on ships in
and near the Pearl Harbor Navy Yard on 7 December 1941, see:
| If you want higher resolution reproductions than the digital images presented here, see: "How to Obtain Photographic Reproductions." |
11 November 2000